MySQL Integration Task
This page describes how to create a MySQL integration task that synchronizes data from a MySQL database into Databend. MySQL tasks support full Snapshot loads, continuous Change Data Capture (CDC), or a combination of both.
If you need to create reusable MySQL connection settings first, see MySQL - Credentials.
Sync Modes
| Sync Mode | Description |
|---|---|
| Snapshot | Performs a one-time full data load from the source table. Ideal for initial data migration or periodic bulk imports. |
| CDC Only | Continuously captures real-time changes (inserts, updates, deletes) from MySQL binlog. Requires a primary key for merge operations. |
| Snapshot + CDC | First performs a full snapshot, then seamlessly transitions to continuous CDC. Recommended for most use cases. |
Prerequisites
Before setting up MySQL data integration, ensure your MySQL instance meets the following requirements:
- A MySQL - Credentials data source has already been created
- The target MySQL instance is reachable from Databend Cloud
Enable Binlog
MySQL binlog must be enabled with ROW format for CDC and Snapshot + CDC modes:
[mysqld]
server-id=1
log-bin=mysql-bin
binlog-format=ROW
binlog-row-image=FULL
After modifying the configuration, restart MySQL for the changes to take effect.
Create a Dedicated User (Recommended)
Create a MySQL user with the necessary permissions for data replication:
CREATE USER 'databend_cdc'@'%' IDENTIFIED BY 'your_password';
GRANT SELECT, REPLICATION SLAVE, REPLICATION CLIENT ON *.* TO 'databend_cdc'@'%';
FLUSH PRIVILEGES;
Network Access
Ensure the MySQL instance is accessible from Databend Cloud. Check your firewall rules and security groups to allow inbound connections on the MySQL port.
Creating a MySQL Integration Task
Step 1: Basic Info
- Navigate to Data > Data Integration and click Create Task.
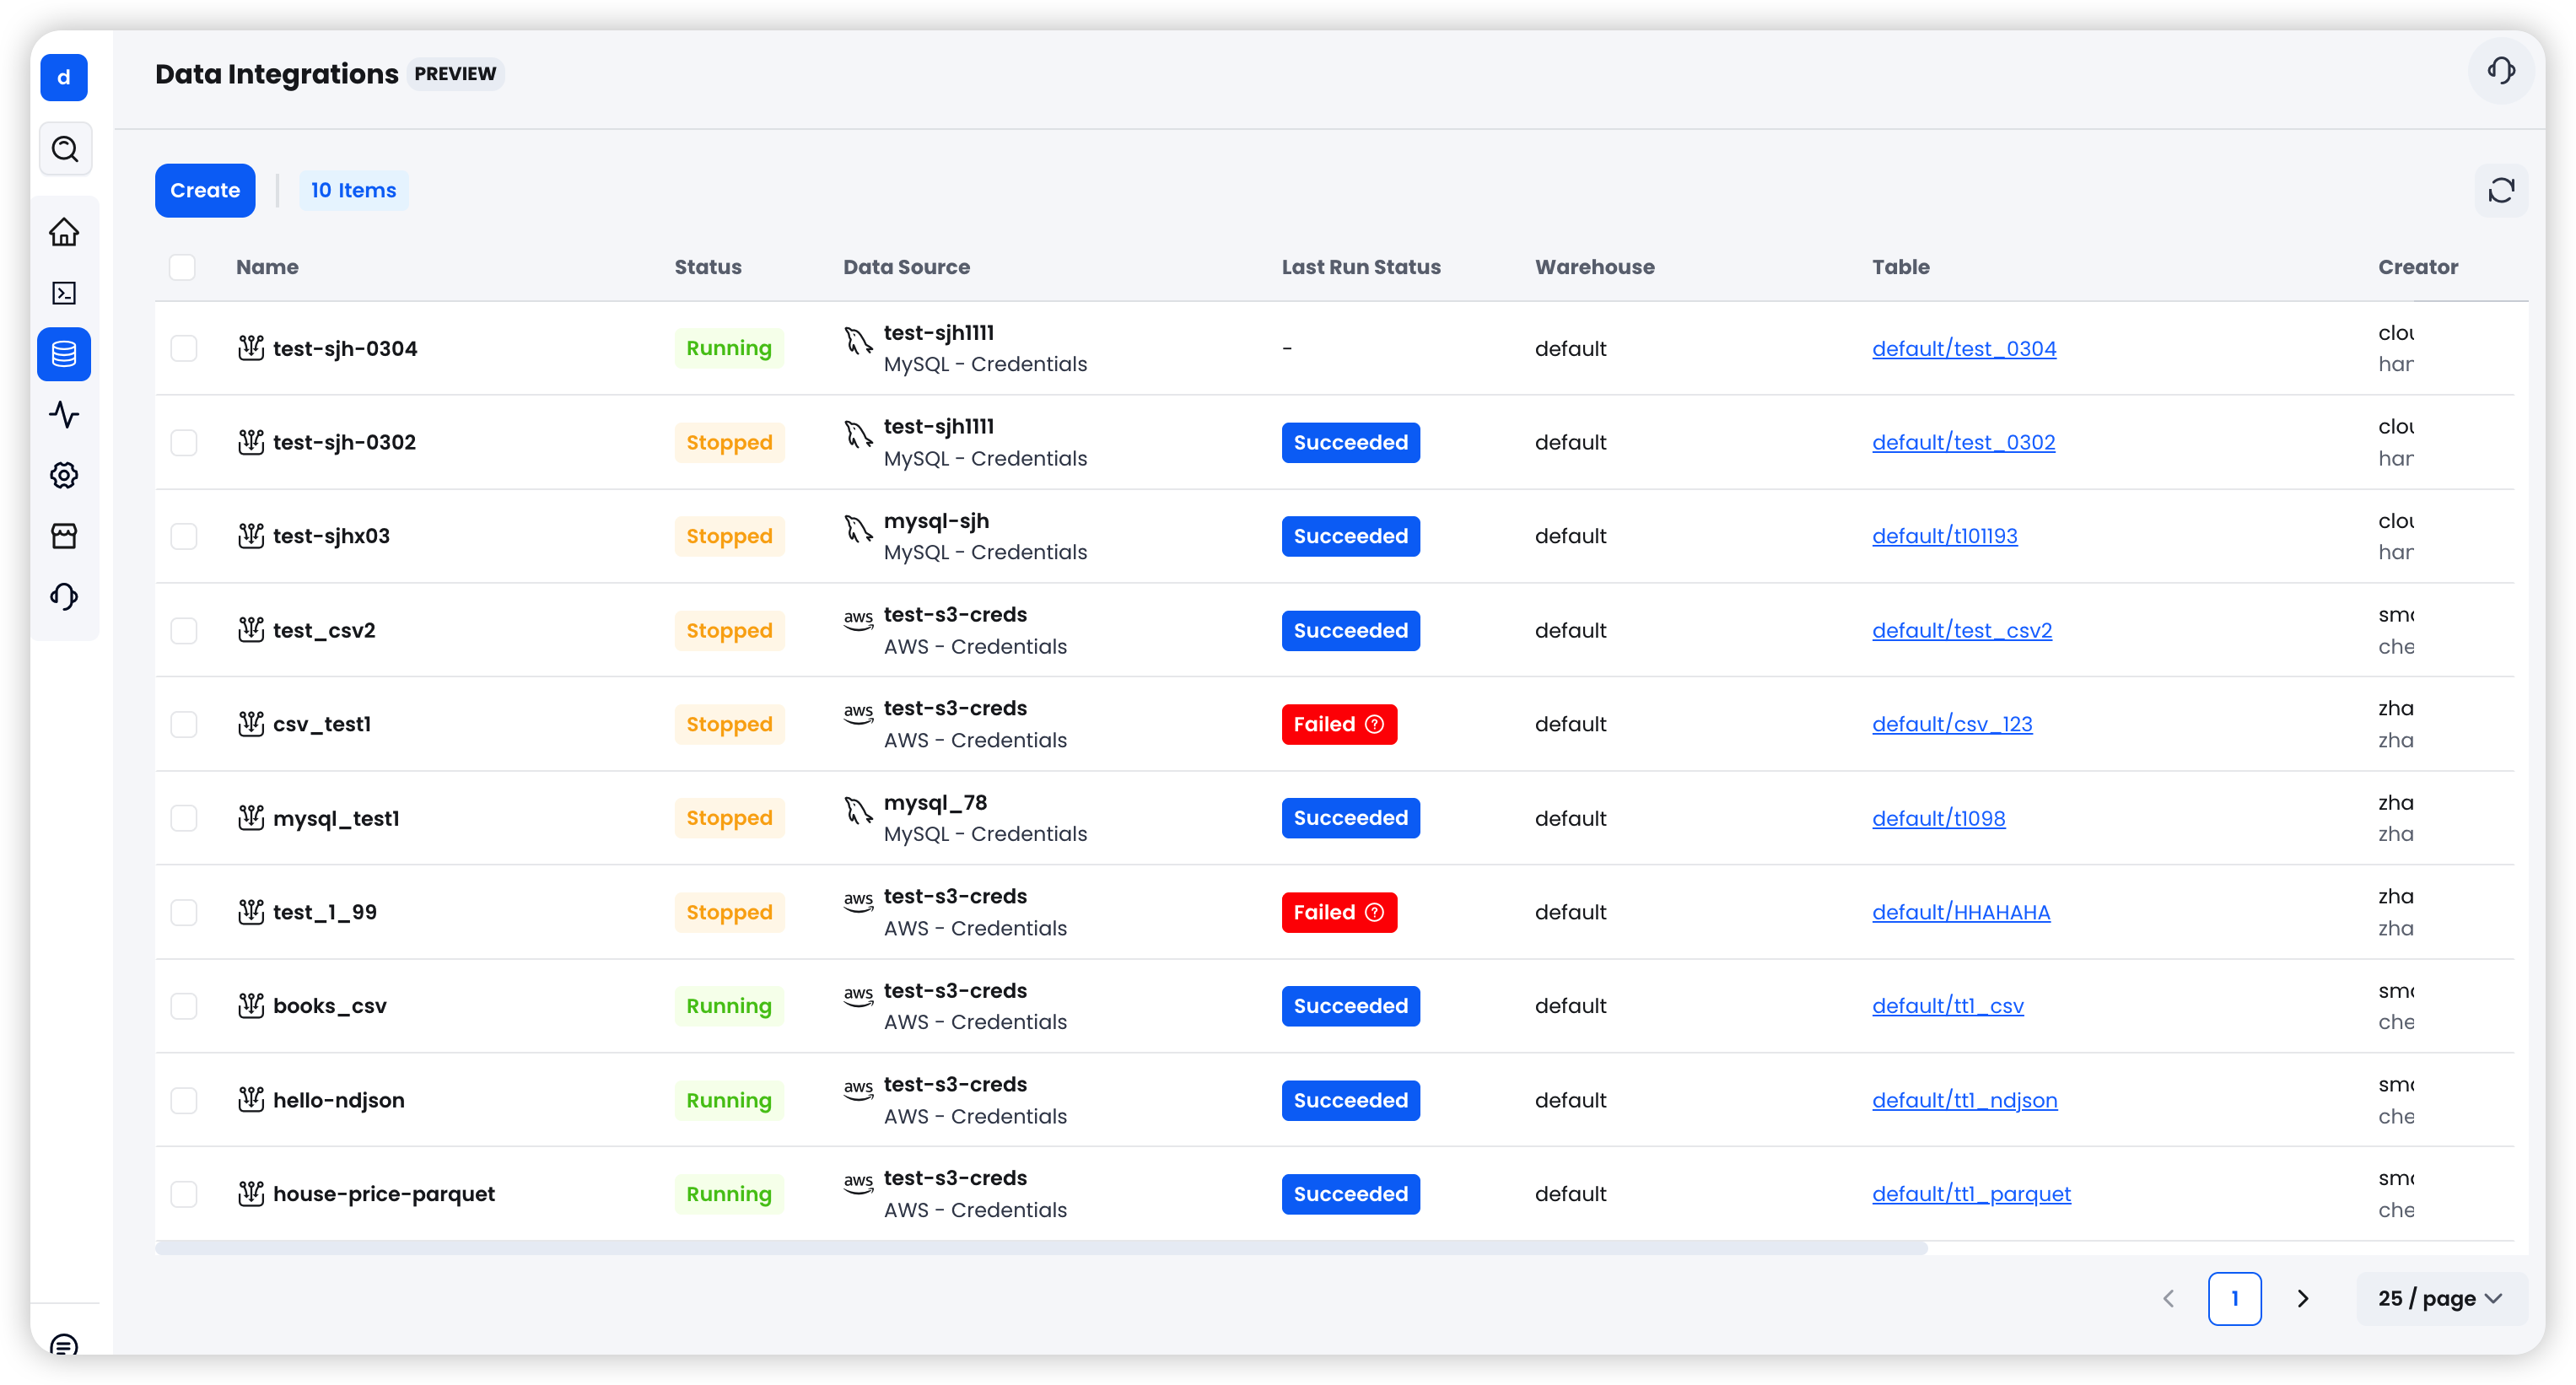
- Configure the basic settings:
| Field | Required | Description |
|---|---|---|
| Data Source | Yes | Select an existing MySQL - Credentials data source from the dropdown |
| Name | Yes | A name for this integration task |
| Source Database | — | Automatically displayed based on the selected data source |
| Source Table | Yes | Select the table to sync from the MySQL database |
| Sync Mode | Yes | Choose from Snapshot, CDC Only, or Snapshot + CDC |
| Primary Key | Conditional | The unique identifier column for merge operations. Required for CDC Only and Snapshot + CDC modes |
| Sync Interval | Yes | Interval (in seconds) between write operations (default: 3) |
| Batch Size | No | Number of rows per batch |
| Allow Delete | No | Whether to permit DELETE operations in CDC. Available for CDC Only and Snapshot + CDC modes |
Snapshot Mode Options
When using Snapshot mode, additional options are available:
-
Snapshot WHERE Condition: A SQL WHERE clause to filter data during the snapshot (e.g.,
created_at > '2024-01-01'). This allows you to load only a subset of the source data. -
Archive Schedule: Enable periodic archiving to automatically run snapshots on a recurring schedule. When enabled, the following fields appear:
| Field | Description |
|---|---|
| Cron Expression | Schedule in cron format (e.g., 0 1 * * * for daily at 1:00 AM) |
| Timezone | Timezone for the schedule (default: UTC) |
| Mode | Archive frequency — Daily, Weekly, or Monthly |
| Time Column | The time-based column used for archive partitioning (e.g., created_at) |
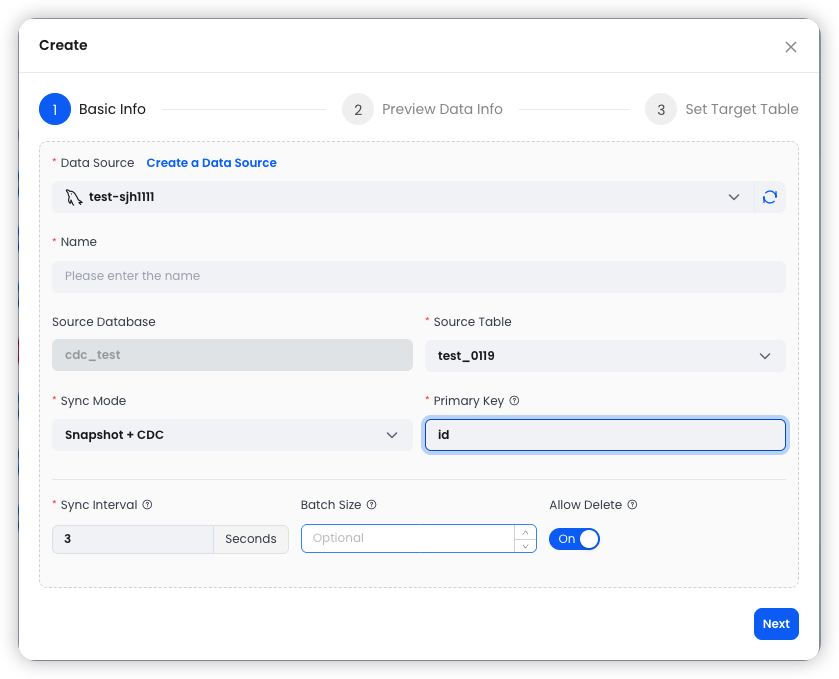
Step 2: Preview Data
After configuring the basic settings, click Next to preview the source data.
The system fetches a sample row from the selected MySQL table and displays the column names and data types. Review the data to ensure the correct table and columns are selected before proceeding.
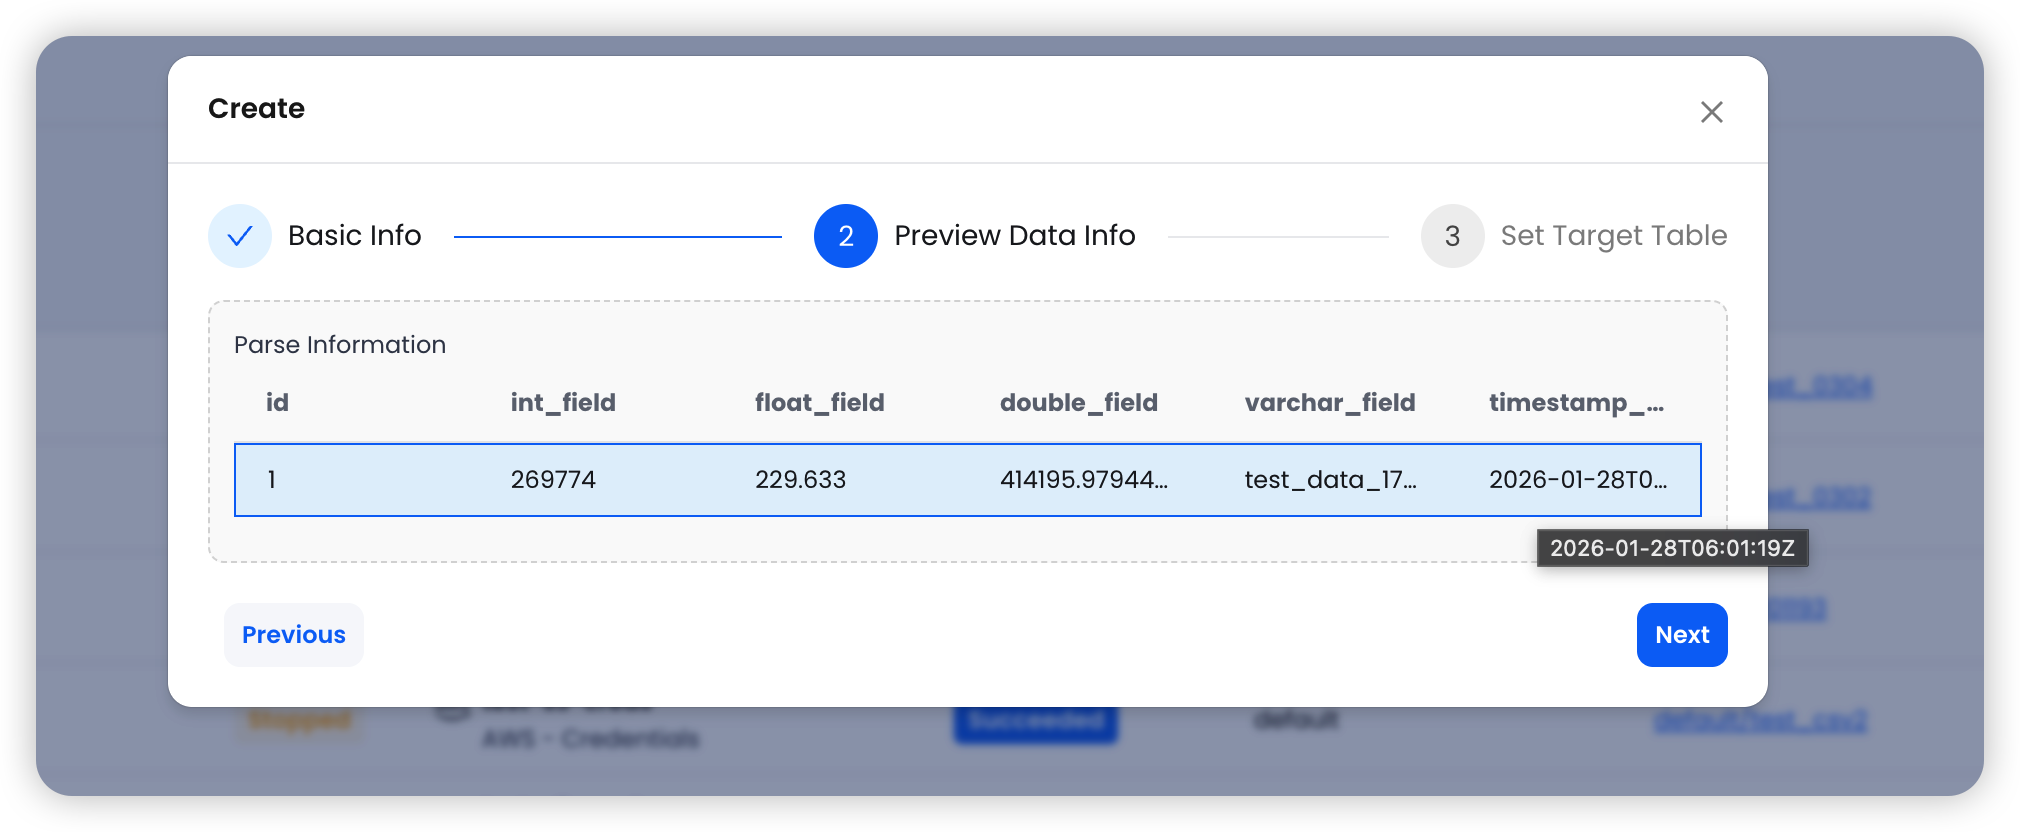
Step 3: Set Target Table
Configure the destination in Databend:
| Field | Description |
|---|---|
| Warehouse | Select the target Databend Cloud warehouse for running the sync |
| Target Database | Choose the target database in Databend |
| Target Table | The table name in Databend (defaults to the source table name) |
The system automatically maps source columns to the target table schema. Review the column mappings, then click Create to finalize the integration task.
Task Behavior by Sync Mode
| Sync Mode | Behavior |
|---|---|
| Snapshot | Runs once and automatically stops after the full data load is complete. |
| CDC Only | Runs continuously, capturing real-time changes until manually stopped. |
| Snapshot + CDC | Completes the initial snapshot first, then transitions to continuous CDC until manually stopped. |
For CDC tasks, the current binlog position is saved as a checkpoint when stopped, allowing the task to resume from where it left off when restarted.
Sync Mode Details
Snapshot
Snapshot mode performs a one-time full read of the source table and loads all data into the target table in Databend.
Use cases:
- Initial data migration from MySQL to Databend
- Periodic full data refresh
- One-time data imports with WHERE condition filtering
Features:
- Supports WHERE condition filtering to load a subset of data
- Supports periodic archive scheduling for recurring snapshots
- Task automatically stops after completion
CDC (Change Data Capture)
CDC mode continuously monitors the MySQL binlog and captures real-time row-level changes (INSERT, UPDATE, DELETE) from the source table.
Use cases:
- Real-time data replication
- Keeping Databend in sync with operational MySQL databases
- Event-driven data pipelines
How it works:
- Connects to MySQL binlog using a unique server ID
- Captures row-level changes in real-time
- Writes changes to a raw staging table in Databend
- Periodically merges changes into the target table using the primary key
- Saves checkpoint (binlog position) for crash recovery
CDC mode requires MySQL binlog to be enabled with ROW format, and a primary key (unique column) must be specified. The MySQL user must have REPLICATION SLAVE and REPLICATION CLIENT privileges.
Snapshot + CDC
This mode combines both approaches: it first performs a full snapshot of the source table, then seamlessly transitions to CDC mode for continuous change capture. This is the recommended mode for most data integration scenarios, as it ensures a complete initial data load followed by ongoing real-time synchronization.
Advanced Configuration
Primary Key
The primary key specifies the unique identifier column used for MERGE operations during CDC. When a change event is captured, Databend uses this key to determine whether to insert a new row or update an existing one. Typically, this should be the primary key of the source table.
Sync Interval
The sync interval (in seconds) controls how frequently captured changes are merged into the target table. A shorter interval provides lower latency but may increase resource usage. The default value of 3 seconds is suitable for most workloads.
Batch Size
Controls the number of rows processed per batch during data loading. Adjusting this value can help optimize throughput for large tables. Leave empty to use the system default.
Allow Delete
When enabled (default for CDC modes), DELETE operations captured from MySQL binlog are applied to the target table in Databend. When disabled, deletes are ignored, and the target table retains all historical records. This is useful for scenarios where you want to maintain a complete audit trail.
Archive Schedule
For Snapshot mode, you can configure periodic archiving to automatically run snapshots on a recurring schedule. This is useful for scenarios where you need regular data refreshes without continuous CDC overhead.
- Cron Expression: Standard cron format for scheduling (e.g.,
0 1 * * *for daily at 1:00 AM) - Mode: Choose Daily, Weekly, or Monthly archiving
- Time Column: Specify the column used for time-based partitioning (e.g.,
created_at) - Timezone: Set the timezone for the schedule (default: UTC)